Advising Notes
The advising notes feature enables advisors to record notes about their interactions with students. They can be used to create notes with related comments, attachments and action items. The advisor can send notifications to students and third parties regarding a note, and the advisor can allow students to vie and add comments and attachments to notes.
Advising notes should be used to document the advising session that you have with a student. The advising notes are used only for advising-related comments. Documenting advising interactions improves communication across campus, improves relationships with students, and increases the likelihood of consistency and continuity of advising services.
Best Practice for Writing Advising Notes
Note: Students can request access to these notes, even if advisee access is not selected on the note. They can also be subpoenaed by third parties under FERPA guidelines.
- Inform the student that advisors make academically pertinent notes that are viewable by others. Use a professional tone when recording advisor/student interactions.
- Keep notes brief and relevant and use only the most commonly understood abbreviations (i.e. AA, TC, Gen Ed., ADHE, etc.).
- Record any advising interactions that will require future follow up on the part of the student or advisor.
- Document referrals to other departments. If the referral is of a sensitive nature (for example, to Student Support Services or Food Pantry), you can write, " Student referred to appropriate department."
Create an Advising Note
- Log in to UAConnect and click the Advisor Center tile on your homepage.
- Click Degree Audit (Advisor) from the left-hand menu.
- Click the Create a Note
 icon.
icon. - Click the Create a Note button.
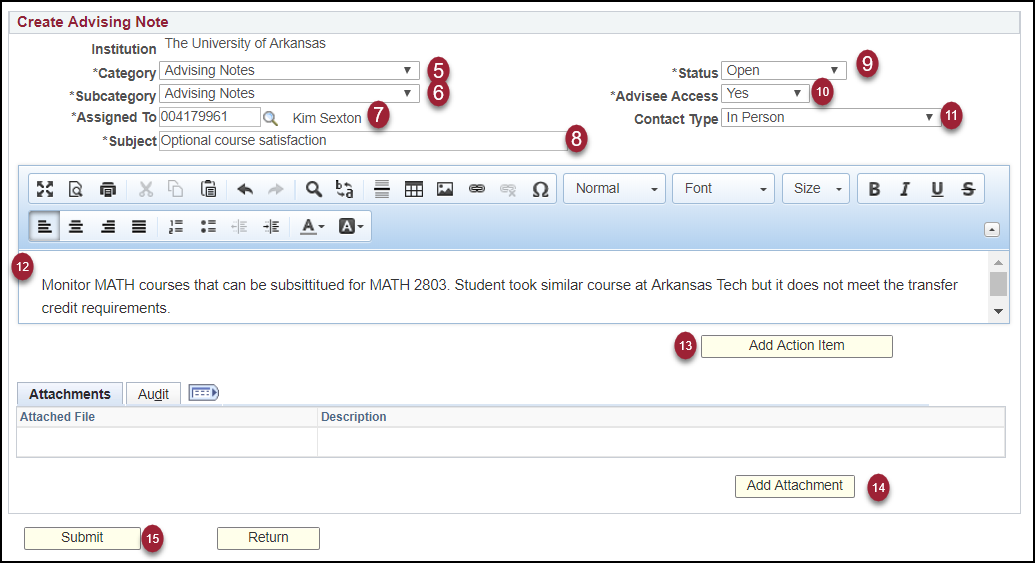
- Select the note category of Advising Notes.
- Select a note subcategory from the drop-down menu: Advising, Degree Audit Notes or Degree Clearance Notes.
- The Assigned To field defaults to the current user. You can also assign the note to another advisor by changing the assignee. To change the assignee, click the search icon to search for and select a different advisor.
- Enter a Subject line for the note.
- Status defaults to Open. Status should be changed to Closed once action items are completed.
- Advisee Access defaults to No. Select Yes to allow advisee access to see the note.
- Select a Contact Type from the drop-down menu: By phone, Email or In Person.
- Create the text for the advising note.
- It is optional to add, browse and remove Action Items for advising notes. The Entered on date is automatically recorded. You can set a Due Date for an Item and Action Item Status to either Complete or Incomplete.
- You may add, view and remove files as Attachments to the advising notes as needed.
- Click the Submit button to save the note.
- Click Notify Advisee to create an email notification.
- Enter email text and click Send.
Optional Navigation
- From the Degree Audit Report page, click the Create Advising Notes icon.
- From the Degree Audit (Admin) page, click the Related Content link and select Advising Notes.
- From the My Advisees list, click the Advising Notes icon.
Filtering Advising Notes
- Click the My Advising Notes button at the bottom of the My Advisees page to filter your advising notes.
- Filter/sort by Subcategory, Status, Contact Type, Created By, Created, Last Updated and Action Items.