Post Enrollment Requirement Checking (PERC)
The Post Enrollment Requirement Checking (PERC) functionality is used to identify students who are missing or no longer meet requisite requirements for classes in which they are enrolled. The process requires two steps: running the post enrollment requirement check and generating the report of students who are not requisite compliant.
This process can be run multiple times, but it is advisable to run it for the final time when grades and academic standings have been processed for the term(s) immediately preceding the term for which the report is run.
Run Post Enrollment Requirement
- Log in to UAConnect and click the NavBar icon on the banner.
- Click the Navigator icon to open the menu files.
- Click Curriculum Management, then click Enrollment Requirements, Post Enrollment Req Checking and then Run Post Enrollment Req.
- Click Add a New Value to create a new run control if needed. If a run control has already been created, enter the run control in the Run Control Id field.
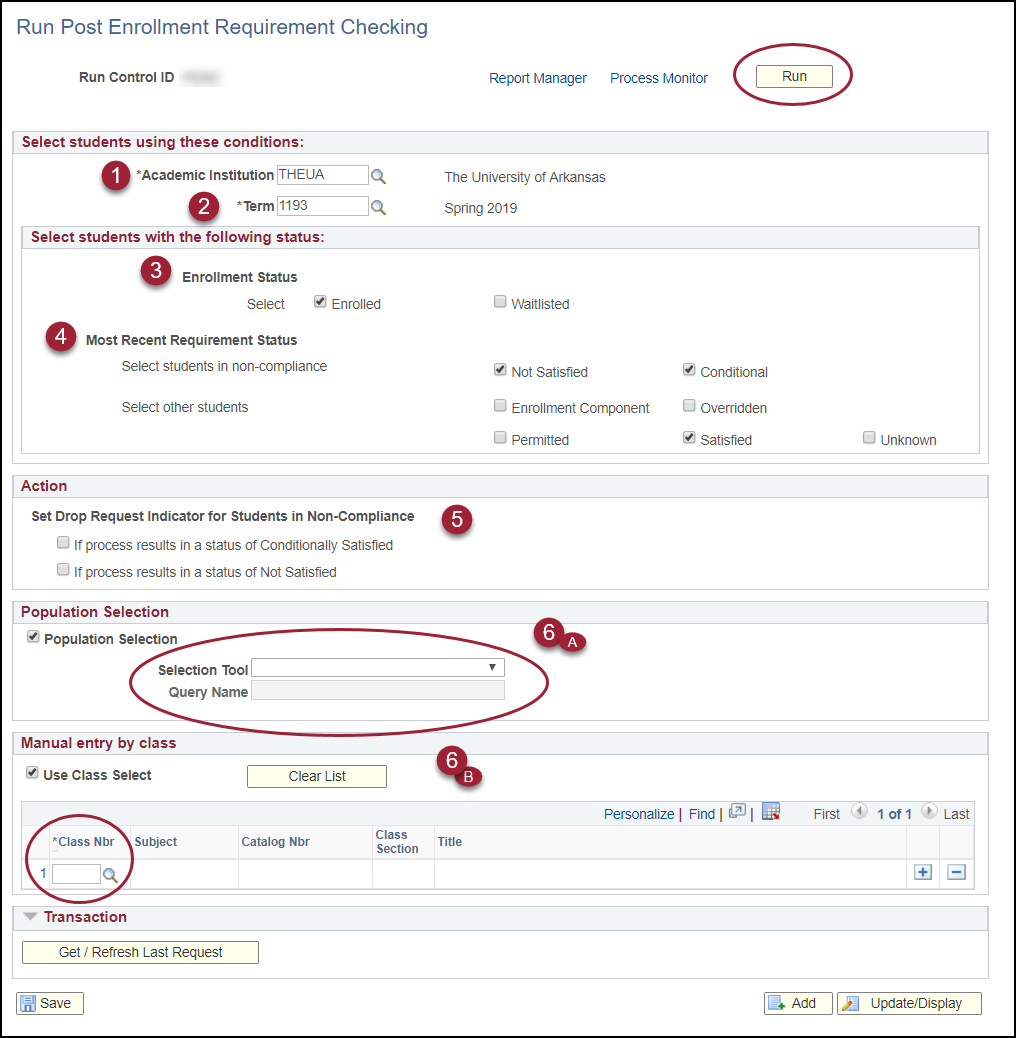
- Enter the parameters to run the process.
-
- Institution and term: Academic Institution is THEUA. Term will generally be the upcoming term, but it is possible that it is needed for both summer and fall terms at the end of the spring term.
- Select the Enrollment Status(es) to be included.
- Select Most Recent Requirements Statuses of Not Satisfied and Conditional. To view all statuses, select all options or select only the status applicable for your search. Include Satisfied status as majors and GPA my have changed.
- Select the Action if applicable. Note: Do not set a Drop Request Indicator if you intend to run the process multiple times per term. Once a drop request indicator is set for a student, the process will not re-evaluate that student in subsequent runs.
- Choose Population Selection or Manual Entry by Class to define what classes are to be evaluated.
- Population Selection requires Query Manager access to pull a subset of classes. Click the Look Up button and select the appropriate query from the available options:
- SSR_REQS_ACAD_ORG - pulls by department
- SSR_REQA_SUBJECT or SUBJECT_CATNBR - pulls by individual subject or individual course.
- The following queries should never be used:
- SSR_REQS_ACAD_GROUP
- SSR_REQS_CAMPUS
- SSR_REQA_CAREER
- Click the Edit Prompts link in the Population Selection area. Click the OK button to save prompt information.
- Click the Preview Selection Results link in the Population Selection area. This returns class section information only and is not student specific data.
-
- If the displayed information is correct, click the Return button and click Save.
- Click the Run button located at the top of the screen.
- Verify SRRQPERC is selected in the Process List and click OK.
- Click on the Process Monitor link. Once the process completes, it should display a Run Status of Success and a Distribution Status of Posted.
- Click the Go back to Post Enroll Requirement link.
- Click the Get/Refresh Last Request button. Verify there are no transactions in error.
Print the Enrollment Requirement Roster
Go to the Navigator and click on Curriculum Management, then click Enrollment Requirements, Post Enrollment Req Checking and then Print Enrollment Req Roster.
- Click Add a New Value to create a new run control if needed. If a run control has already been created, enter the run control in the Run Control Id field.
- Enter the parameters to run the process.
-
- Institution and term: Academic Institution is THEUA. Term should match whatever term(s) you ran the Post Enrollment Requirement Checking process.
- Select Display Options for the report output, from Summary, Detail or Combined View.
- Select a Sort Option.
- Select Enrollment Status(es).
- Select Not Satisfied and Conditional as the most recent requirement statuses.
- Select other students to see:
- who was overridden into a class
- Choose Population Selection or Manual Entry by Class to define what classes are to be evaluated.
- Population Selection requires Query Manager access to pull a subset of classes. Click the Look Up button and select the appropriate query from the available options:
- SSR_REQS_ACAD_ORG - pulls by department
- SSR_REQS_SUBJECT or SUBJECT_CATNBR - pulls by individual subject or individual course.
- The following queries should never be used:
- SSR_REQS_ACAD_GROUP
- SSR_REQS_CAMPUS
- SSR_REQS_CAREER
- Click the Edit Prompts link and edit prompts as needed.
- Click the Preview Results link. Note: This returns class section information only, not student specific data.
-
- Click the Return button at the top of the page.
- Click Save.
- Click Run at the top of the page.
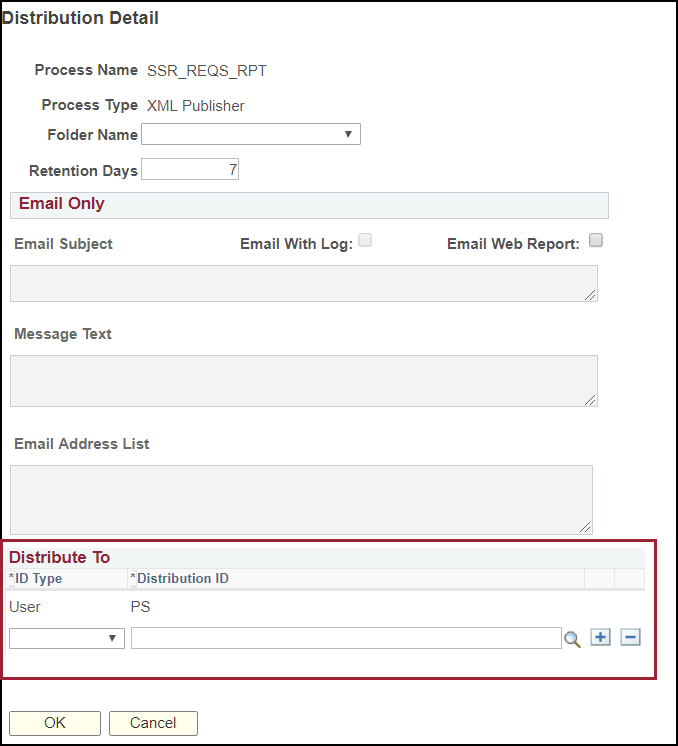
- Click the Distribution link. Select User from the drop-down. Enter your username in the Distribution ID field and click OK.
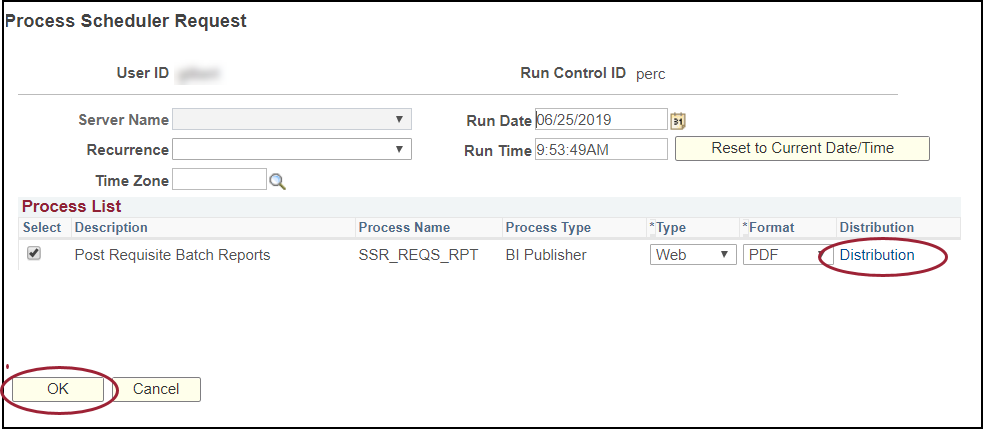
- Click OK to run the report.
- Check the Process Monitor link. When the process displays a Run Status of Success and a Distribution Status of Posted, click the Go Back to Print Enrollment Req Roster link.
- Click the Report Manager link at the top of the page.
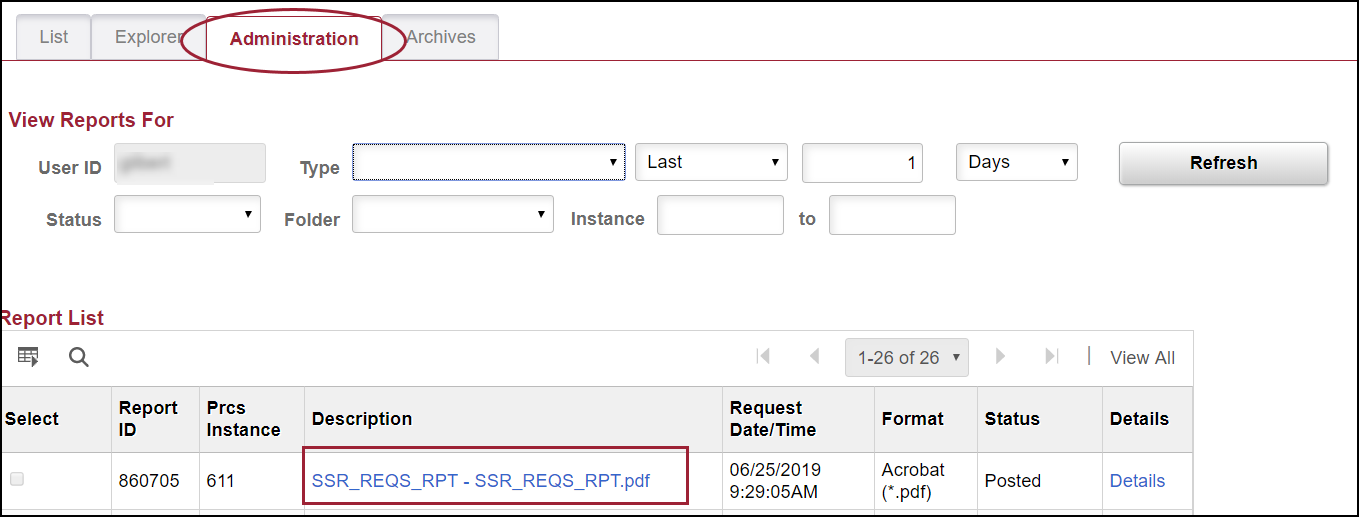
- Click the Administration tab to download the report.
- Click the SSR_REQS_RPT-SSR_REQS_REPT.pdf link.