Build a Schedule of Classes
This document details how to update and add new sections, and how to link classes. An appendix is available for definitions and administrative functions.
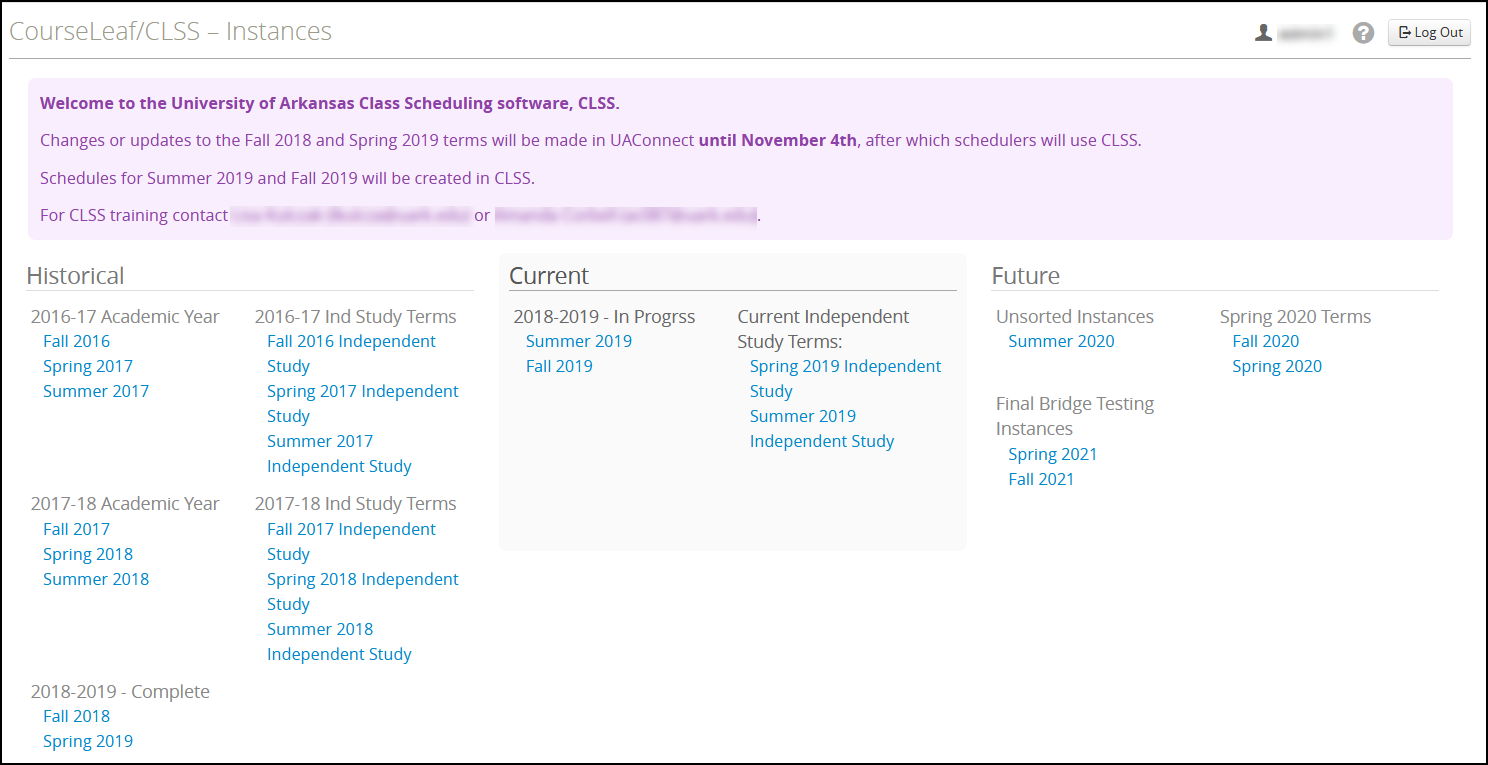
An "instance" is a specific term as defined by the University of Arkansas. Common instances are
Spring 2019, Summer 2019 and Fall 2019. The ability to update or view depends on where
you are in the semester.
Courseleaf CLSS Modes
The term "modes" in CourseLeaf CLSS is used to identify how data flows between CLSS and UAConnect. CLSS utilizes two modes of data flow: Design and Refine.
| Design Mode | The Call for Classes is sent out by the Office of the Registrar when the new term
classes have been rolled and data moved into CLSS. At this time, data is not exchanged
between CLSS and UAConnect. All scheduling changes (time, instructor of record, sections,
etc.) should be made in CLSS. In Design Mode, CLSS will contain the most updated version for all scheduling information. When validation has been performed with no outstanding errors, the scheduling unit is submitted. Class data moves into UAConnect and the scheduling unit(s) moves to Refine Mode. |
|---|---|
| Refine Mode | Data is exchanged immediately between CLSS and UAConnect. Any changes, new sections,
or deletes to existing sections that are successfully saved in CLSS will update UAConnect
immediately (unless the requested change requires approval), one-by-one, for each
department. In Refine Mode, updates to sections originate in CLSS, but UAConnect is viewed as the source of record for all scheduling information. |
CourseLeaf CLSS Common Phases
The term "phases" in CourseLeaf CLSS is used to identify the distinct time periods of the scheduling cycle where the norms of scheduling (such as making changes to meeting patterns) differ significantly from the periods preceding and/or following. Access will be different based on the period.
|
Plan (Design/Refine Mode) |
When in Plan Phase for a term, departments are entering their initial schedule together
and are working to still find faculty to teach, what the enrollment capacities/maximums need to be, and when these sections should be scheduled. Since plan phase is early in the scheduling cycle for a term (before a batch room assignment or registration), most fields are editable bv schedulers. |
|
Room Assignment (Refine Mode) |
When in Room Assignment Phase for a term, the bulk of classes are assigned to rooms
either based on historical preferences, requested room characteristics, or enrollment capacities/maximums. Schedulers are locked out of making changes until the batch room schedule process is completed. Note: If rooms are being scheduled for summer, updates are allowed for fall. |
|
Publish (Refine Mode) |
When in Publish Phase for a term, departments are making final scheduling changes just before the schedule goes live for students to see in the class search. Publish phase typically also covers the registration period of the scheduling cycle, meaning that certain fields such as meeting patterns or session cannot be adjusted after students have enrolled. Scheduling changes may trigger a workflow or may require students to be unenrolled before required changes can be made. |
|
Archive (Refine Mode) |
When in Archive Phase for a term, the term becomes read/reporting only for schedulers. |
|
Session in Progress (Refine Mode) |
Session in Progress Phase will lock down specific sessions as the term progresses, based on session start and end dates. (See chart for process flow. Dates will be determined each semester.) Contact the Office of the Registrar if updates are required after the lockdown date. |
When UA schedulers work in CLSS, they will always work in both a specific mode and phase. Design Mode/Plan Phase is when UA schedulers first work on the schedule after it has been rolled from a previous term. The bulk of the work should be done in this mode/phase. Refine Mode/Archive Phase will always be the last mode and phase. All mode and phase combinations in between represent when the bulk of edits are done to the schedule in CLSS.
Design Mode = No Data moves between UAConnect and CLSS
Refine Mode = Data moves between UAConnect and CLSS
| Plan Phase | Call for Classes: Department Schedulers update class information in CLSS. -Charge instructors. dates/times, etc. -Validate -Correct all errors -Validate until no errors remain -Submit *Schedule submission requires completion of workflows before class data bridges to UAConnect. |
| Room Scheduling Phase | *Batch Room Scheduling: Department schedulers are locked out and cannot enter updates for a specific time. |
| Publish Phase | Schedule released to campus community. Department Schedulers can continue updates until 11th class day for Start of Term, Regular Session and 8W1. |
| Archive Phase | Term is locked and Is view only. |
| *Department schedulers will be locked out for the term that is currently in process of Batch Room Scheduling. Example: Batch Room Scheduling for Summer 2020 is processing and users are locked out. Department schedulers can continue to update and work in Fall 2020 term. | |
Example: Spring 2020 - Call for Classes
- April 1: Design Mode/Plan Phase
- August 24: Refine Mode/Room Scheduling Phase
- September 1: Refine Mode/Publish Phase
- 5th day of 8W2 classes: Refine Mode/Archive Phase
- Will vary by session in progress: Refine Mode/Archive Phase
How to Build a Schedule of Classes
To access CLSS, log in at https://nextcatalog.uark.edu/wen.
The hierarchy within CLSS is Instance (term), Scheduling Unit (department), and Course Sections (individual classes). Updates can be made to your department while view access is available for all classes.
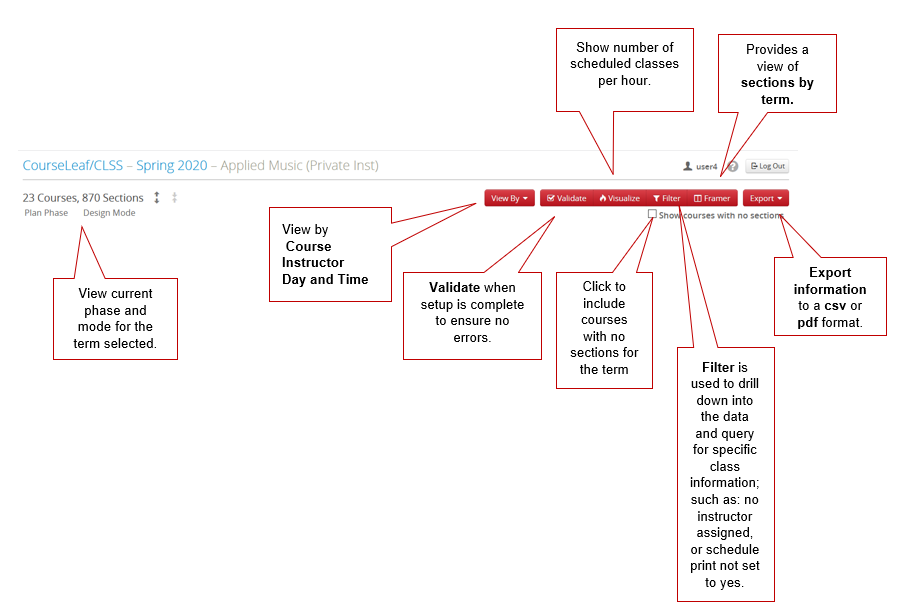
Lists can be sorted by clicking the arrows![]() by the column name. Sort can be ascending or descending order.
by the column name. Sort can be ascending or descending order.
Double-click the four-digit ID number or department Name to expand the scheduling unit/department's page.

Navigation
- View By menu allows you to view by Course, Instructor, or Day and Time.
- Click Validate when setup is complete to ensure no errors.
- Check the Show courses with no sections check box to include courses with no sections for the term.
- Filter is used to drill down into the data and query for specific class information, including: no instructor assigned or schedule print not set to yes.
- Export menu allows you to export information to CSV or PDF format.
Updating Classes
- Review the classes that have been copied from the prior term. Click the arrows
 to display all currently scheduled sections, and double-click to expand the scheduling
unit/department's page.
to display all currently scheduled sections, and double-click to expand the scheduling
unit/department's page.
Note: Be mindful of the FAY and OFF offerings and select the appropriate class.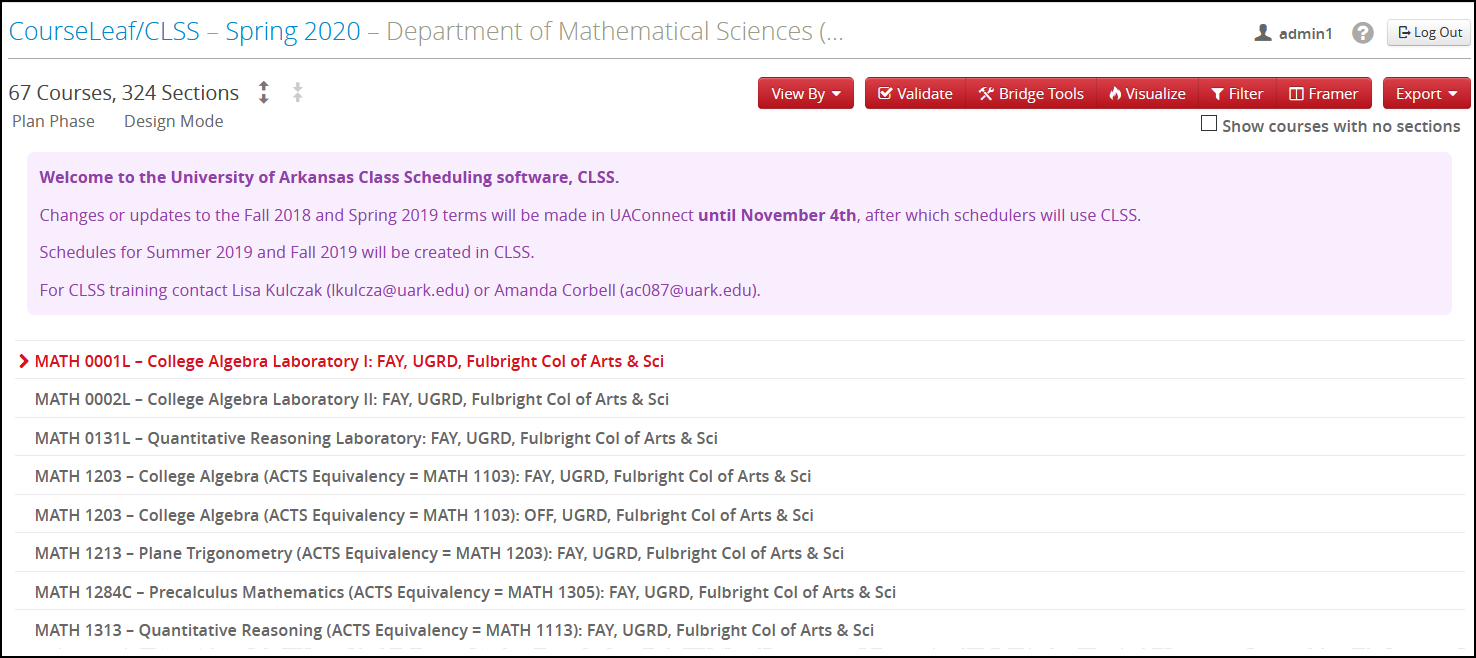
- Change instructors, meeting patterns, rooms, etc., for the new term, and click Save Selection when completed. Full descriptions of all fields are listed in the Appendix.
Note: The pencil icon denotes an editable field.
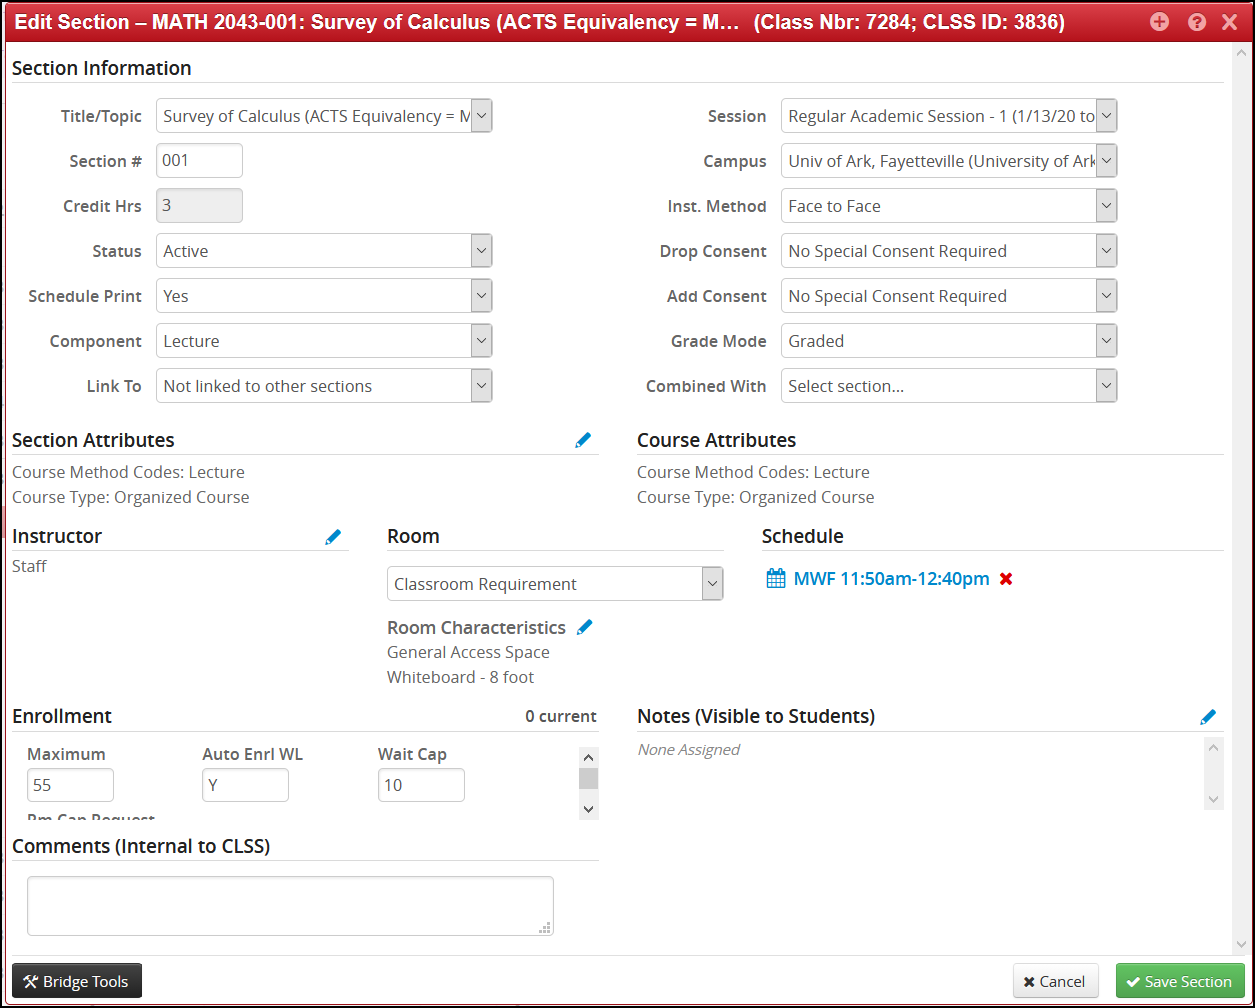
Adding a Section to Courses with No Sections
- Click the arrows to display all currently scheduled sections.
- Double-click to expand the scheduling unit/department's page.
- Select the Show courses with no sections box. This will display all courses available to schedule.

- Click the plus button
 to add a new section.
- Enter all fields as needed. Click Save Selection. Full descriptions of all fields are listed in the Appendix.
How to Link Sections
Full descriptions of all fields are listed in the Appendix.
- Add a new section by clicking on the plus button .
Warning: Clicking the red X button will delete all class sections. To delete a section, click the clear X button to the left of the section number.
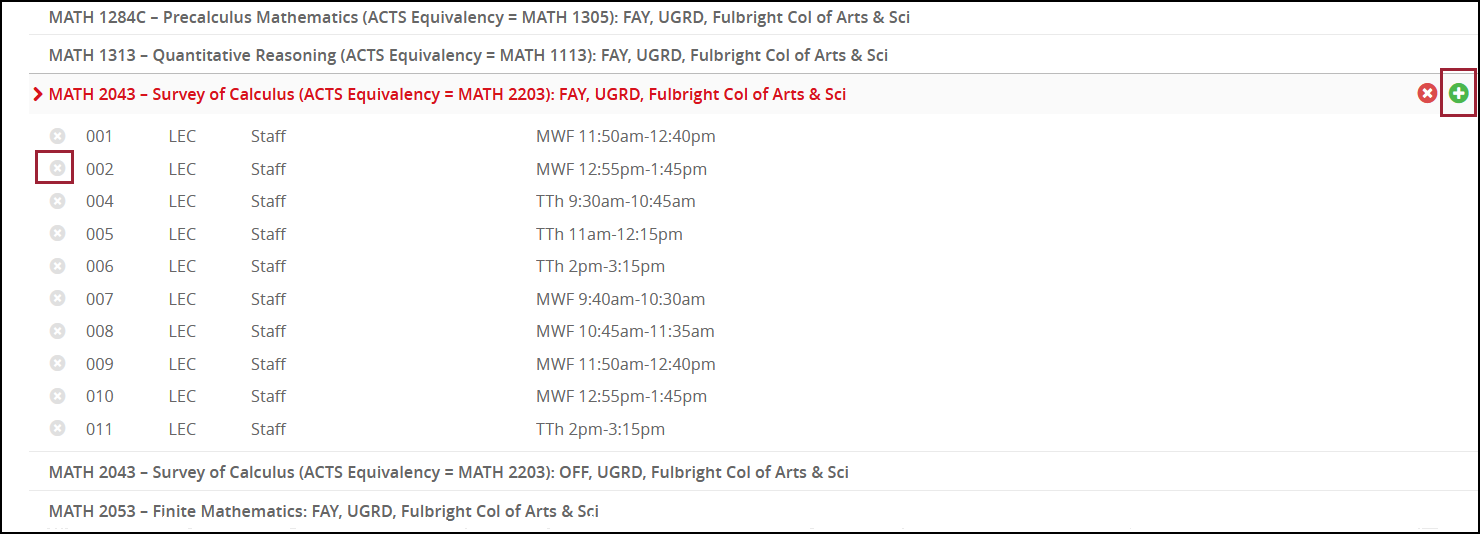
- Enter or edit all fields as needed. This is the primary section, and the Link To field will always be set to Not linked to other sections. Click Save Selection when done.
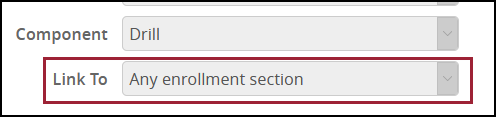
Classes that have a non-enrollment drill or lab need to be linked from the supplemental instructions sections to the appropriate lecture class(es).
- Select the appropriate class from the drop-down menu in the Link To field.
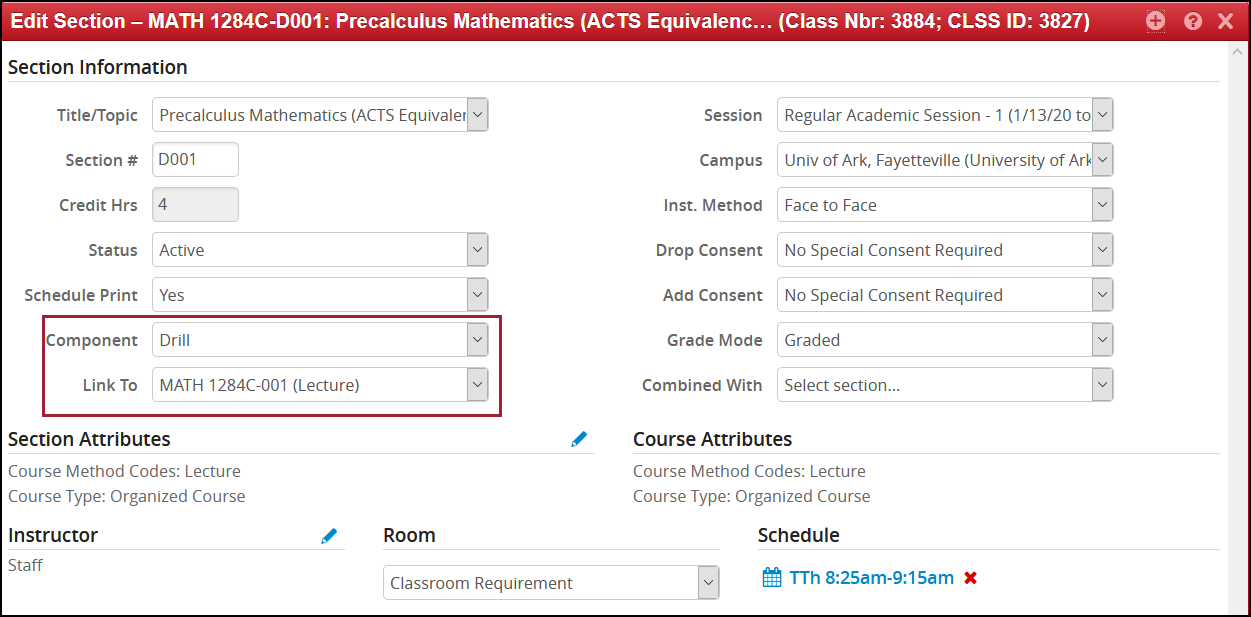
- To link drill, laboratory and supplemental instruction sections not associated to
specific lecture classes, select the drill, lab or supplemental instruction.
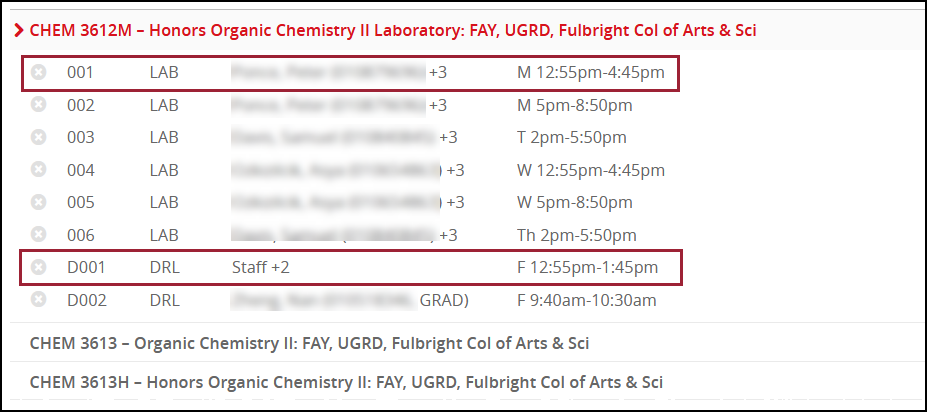
- Double-click the class to select.
- Select Not linked to other sections from the drop-down menu in the Link To field.
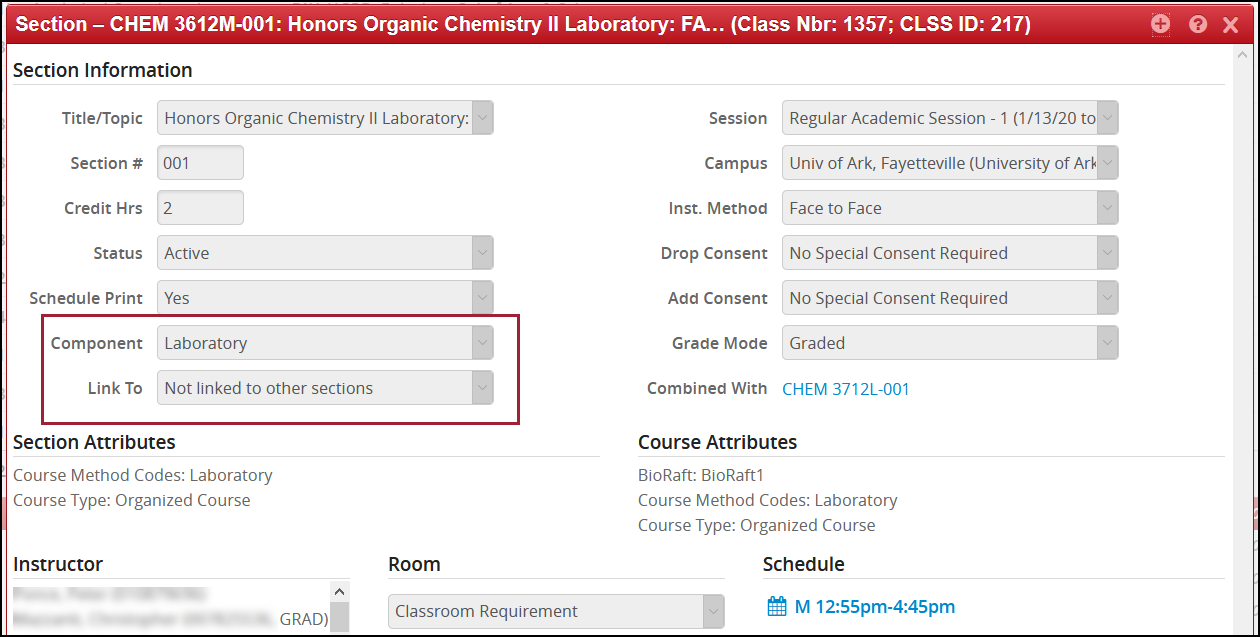
- Select Any enrollment section from the drop-down menu in the Link To field.
- Click Save Selection.