Schedule of Classes: Create
Build the Schedule of Classes
There are four views of scheduling features in UAConnect. The differences in the components are the view of the classes and the search function.
The security setting for an individual user controls the pages and fields that they can view. A user may not see all available pages or fields.
- Maintain Schedule of Classes displays only those classes that have already been scheduled for a term. This component is identical to the Schedule New Course component. Use this component to view and to modify scheduled classes.
- Schedule New Course displays all courses available to be scheduled for a term. When adding multiple sections of a class, add the sections in the Schedule New Course component. Use this component to schedule courses that have newly been added to the catalog, but that have yet to be scheduled for any term.
- Schedule Class Meetings displays individual class sections that have been scheduled. Use this component to add or update meeting times, facilities and instructors for one class section at a time. The benefit is a faster performance time in the save function because the edit functions are checking against only one section.
- Update Sections of a Class displays a snapshot summary of all section information for a class. Use this component to view and make changes to enrollment details for several class sections at one time.
Schedule of Classes Terminology
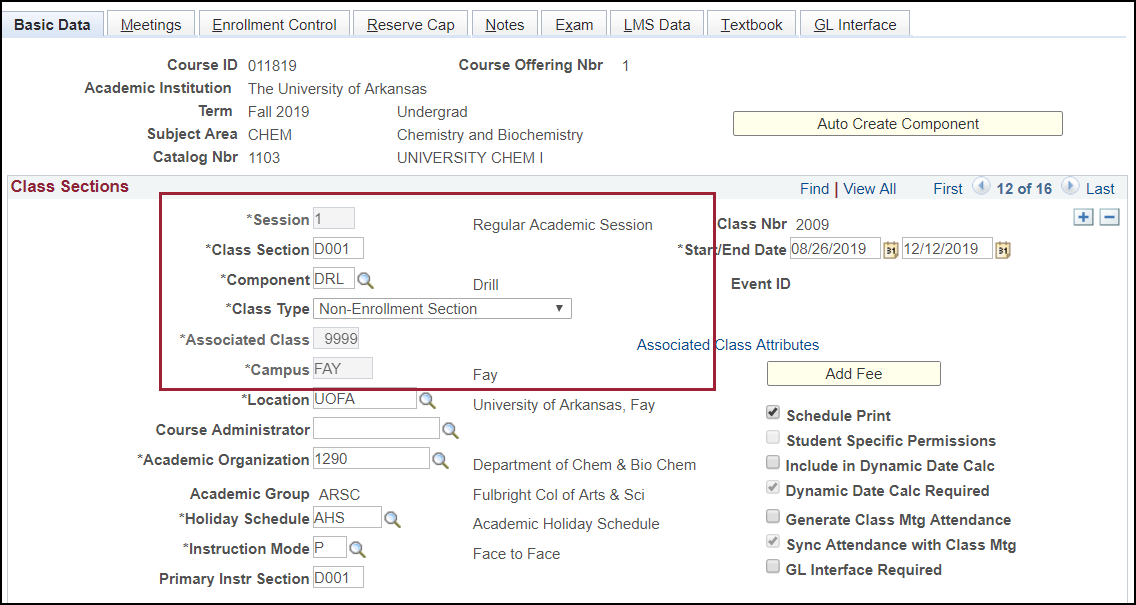
| Class Associations | A means of tying specific sections of a component together. This functionality allows a department to tie several labs to one section of lecture, thereby prohibiting students from registering for another section of the lecture. Using an association number of "9999" allows students to do the opposite, enroll in any lab section, regardless of what lecture they select. Components or sections that are not tied together should have different association numbers. |
| Combined Sections | A functionality that enables two or more separate classes to be offered as one class offering with one instructor, one location, one meeting pattern, and one enrollment capacity. Example: HUMN 3163 On Death and Dying and SCWK 3163 On Death and Dying. Combined sections are also used when offering both graduate and undergraduate credit for the same class. |
| Components | Components are parts of the course. Each course has at least one component. For instance, a lecture course will have Lecture as its component. Courses may have an associated lab or drill for an additional component. Components do not have their own course ID. They are tied to the original course. However, they must be scheduled as their own separate class section, as failure to schedule associated components will prevent students from being able to register for these classes. |
| Offerings | Not to be confused with sections of a class. An offering is the same class with a change in the details. In the scheduling process, be sure to select the offering that is coded with the required details. For example, a class may have an undergraduate offering and a graduate offering, an on-campus offering and an off-campus offering, or a MIN offering. In the scheduling process, be sure to select the appropriate offering. |
| Class Type | Classes should be set as "Enrollment" section unless they are an associated lab or drill. These should be set as "Non-Enroll". Failure to set Class Type correctly will prevent students from being able to register for these classes. |
| Instruction Mode | All classes scheduled under the Campus of "FAY" should be set with an Instruction Mode of "P" (face-to-face). Off-campus classes are generally scheduled by Global Campus and will have different instruction modes depending on whether they are offered online or via distance education. |
Schedule a New Course
- Navigate to Curriculum Management, Schedule of Classes, Schedule New Course. The Academic Institution field defaults to THEUA.
- Input the correct term code in theTerm field, or click the magnifying glass icon to look up the value.
- Input information in other fields on the Search page to locate the required class
or classes such as Subject Area, Academic Career, or Course ID.
The search can be as specific or as general as needed. Be aware that only the first 300 results will be returned in the search. For most purposes, a search producing a smaller population is more useful. - Click the link in search results that describes the class to be added. This action
opens the Basic Data tab in the Schedule New Course component.
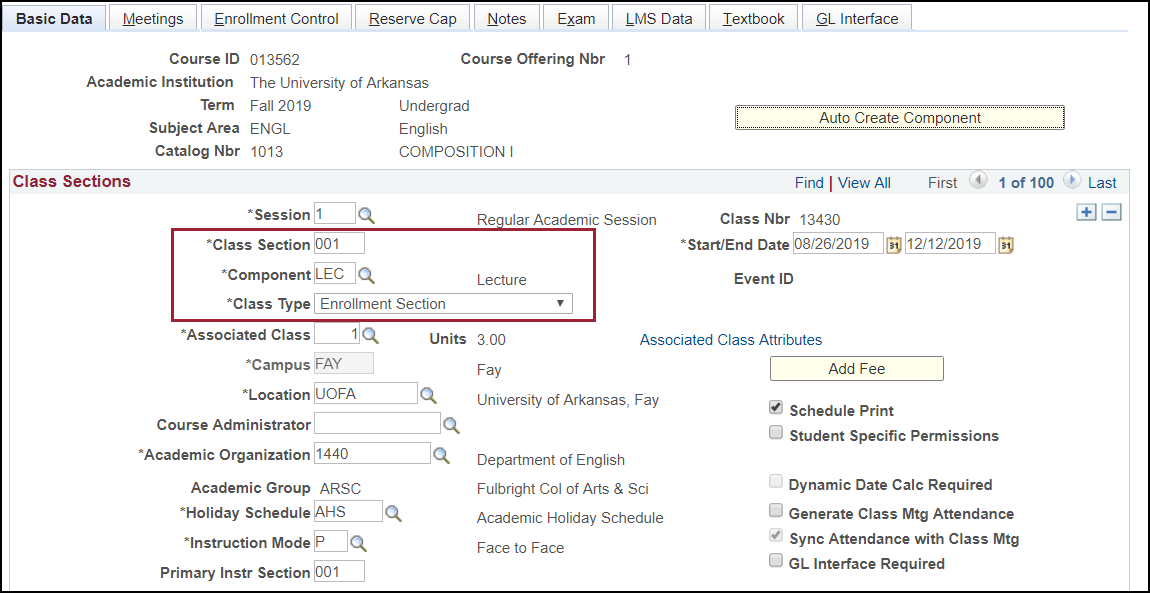
- Class Sections Group Box: Input the code for the session this class meets in the Session field, or click the magnifying glass icon to see all the session values. This example shows a Session code of 1, Regular Academic Session. The session code determines the Start/End Date fields. If the class meets for a mini session, the Start/End Date information must be manually entered on both the Basic Data and Meetings tabs.
- Enter the section number in the Class Section field. Class Section number convention
is as follows:
- Contains a three-digit number. The first section of a course begins with 001 (can use 001-599).
-
Lab and Drill sections follow the same numbering conventions, but are preceded by either an L or
D (for honors sections, M or E).
(ex: L001 or D001) - All self-paced correspondence courses have section numbers in the 800 range.
- All courses offered as OFF CAMPUS sections have a section number beginning with 901.
- Study Abroad courses have a section number beginning with 600
- The Component field defaults to LEC and the Class Type field defaults to Enrollment. To add a zero-credit component, such as a drill or lab, add a new row to the associated
class.
On the new row, a zero-credit component Drill will be added. The Session, Start/End Date, and Class Section fields default in. Because the Component and Class Type fields default to LEC and Enrollment and this section is a zero-credit drill, these two fields must be changed.
Note: UAConnect does not allow two sections to have the same Component type and Class Type.
- The Associated Class field is used to assign linkage to sections. For example, a special topics class
will have multiple sections, all with different topics. A student can enroll in several
sections of the same course in this case. Each section of the course must follow in
sequence, starting with 1, in assigning the Associated Class code. If two sections
of the course have the same code and the student drops one, UAConnect will drop them
from the other automatically. For zero-credit components, this field most often will
be 9999, indicating that the component can be linked to any section of the parent course.
(See Class Associations terminology for other options.) The parent course Associated Class code must be sequenced beginning with 1. Set the association number to match the
class number.
Ensure that the Schedule Print check box is checked to allow a section to be shown in the Schedule of Classes and Class Search Functions.
- Class Topic Group Box: If a class has variable topics, click the magnifying glass icon next to the Course Topic ID field, and select the required topic.
- Class Attributes: Every class should have at least two attributes: Course Method Codes and Course Type. These are set at a catalog level and roll to the Schedule of Classes. Other attributes
may be added to individual class sections by the departments scheduling the class.
Meetings
Use this page to assign a room, to schedule meeting times, and to assign an instructor.
When scheduling a large number of sections use the Schedule Class Meetings component to schedule facility and meeting pattern information. Because the system only performs edit checks (Facility Conflict checking) on an individual class section (rather than for all sections of the class), performance is faster.
- Click the magnifying glass icon to the right of the Pat (Pattern) field. The Lookup page appears for that field.
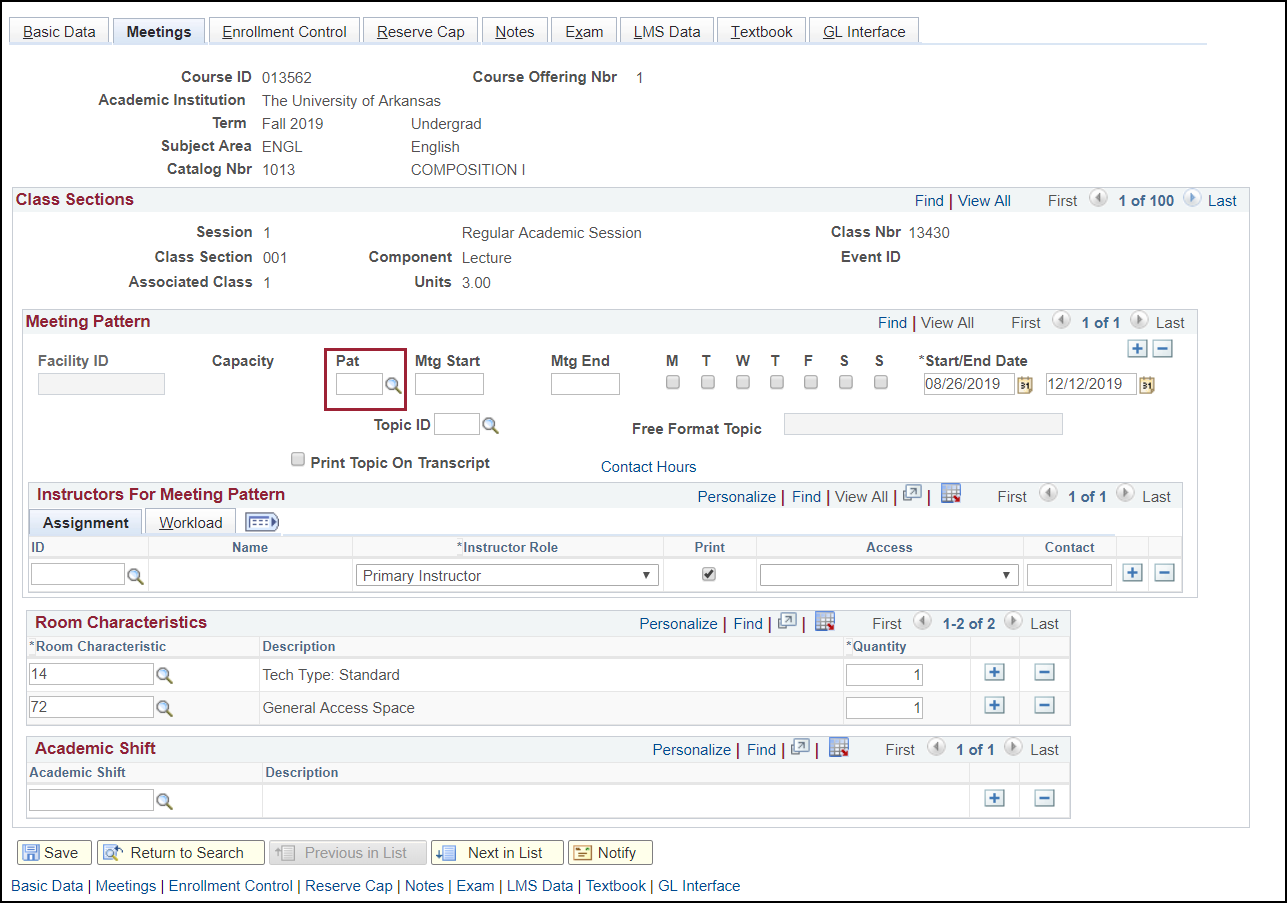
- Click Look Up to see a list of all the values available for that field. Select the standard meeting
pattern that the class follows in the PAT field or leave the field blank if the class follows a non-standard pattern.
NOTE: Use the PAT field instead of the days of the week check boxes. The system checks the boxes based on the PAT selected. The checkboxes are only to be used for non-standard class meetings. - Input the time the class begins and ends in the Mtg Start/Mtg End fields. Example: 0930a indicates 9:30a.m. The leading zero must be entered. If a standard meeting pattern has been entered, the system calculates the ending time based on the starting time. This can be changed for an irregular meeting time. If a class meets at different times on different days, insert tows for each unique meeting pattern.
- Input the instructor ID in the ID field in the Instructors for Meeting Pattern group box or click the magnifying glass icon to look up the ID.
- Click the plus button to add additional rows for multiple instructors.
- Select the role from the Instructor Role field drop-down menu. Values include Prim Inst, Sec Inst or a TA.
- Check the Print check box if the instructor's name should be printed in the Schedule of Classes.
- Select the type of grade entry access the instructor should have from the Access drop-down
menu. Each assigned instructor must have access for each meeting pattern.
- Approve: Instructor can enter grades and approve the grade roster.
- Grade: Instructor can only enter grades for the class.
- Post: Instructor can enter grades and approve the roster.
- Enter the appropriate Room Characteristic(s). Click the magnifying glass icon to look
up available options. Typically, you will need to select at least one of the following:
- 72: Classroom/Auditorium Space (use this to indicate a general access classroom is needed)
- 77: Lab/Special Purpose Space (class will not be included in the batch room scheduling process)
- 91: No Room Needed (class will not be included in the batch room scheduling process)
Enrollment Control
Click the Enrollment Cntrl tab. This is where the Class Status is indicated, whether Consent is required to take the class, and where the maximum Enrollment Capacity for the class can be set.
- Select the class status from the Class Status drop-down menu. Values are: Active, Stop Further Enrollment, Cancelled Section, or Tentative Section. This field has a default status value of Active. Classes with an Active status are the only ones that will display in Class Search, and the only ones that allow students to enroll.
- Press the Cancel Class button to cancel the class section. Cancelling a class drops all currently enrolled
students and adjusts fee 100%, regardless of the date the cancellation is processed.
Note: The Class Status field must first be set to Cancelled Section in order to select the Cancel Class button. The date of the cancellation will display next to the button. - You must check the Cancel if Student Enrolled check box to cancel a class if students are enrolled. If this box is not checked, UAConnect will prevent posting of the cancellation.
- The Consent field value defaults from the Course Catalog. This value may be overridden by selection from the drop-down menu. The available values are: No Consent, Dept. Consent, and Inst. Consent. Do not use FYE consent.
- Type the number of seats wanted for the classroom to override the Requested Room Capacity field. This field defaults from the Default Section Size in the Course Catalog. This is for use in the batch scheduling process.
- Type the number of seats wanted for the classroom to override the Enrollment Capacity field. This field defaults from the Default Section Size in the Course Catalog. This number should reflect the maximum enrollment allowed for the class.
- If your department uses the Wait List function, be sure to type the number of students you wish to allow to be added to the Wait List. You must also check the Auto Enroll from Wait List checkbox in order for eligible students to be moved from the Wait List into the class when the Wait List process runs. If you are wait-listing a Combined Section class, you must also set that value on the Combined Sections Table.
- Click Save.
Notes
This section deals with class-specific notes. Each note is displayed only on the detail for the specific class section to which it is attached. Notes are optional, but they do roll from term to term in the Prior Term Copy process.
- Click the Notes tab.
- UAConnect creates the Sequence Number. The number determines the display order of the note if there are multiple notes.
This sequence number can be overridden.

- Print Location sets the print location of the note, either Before the class listing, or After it.
- Use Note Nbr search to attach a pre-existing standard note. Selecting an item from the list will populate the adjacent field with the detail. If you would like a Note Nbr created for your department for future use, contact the Office of the Registrar.
- To modify the existing note, press Copy Note. The text will be copied to the Free Format Text area and eliminated from the previous area. The note number will be erased.
- Use the Free Format Text field to type a free format text note. Both a free format note and a Note Number may be specified for the same class section.
- Click Clear Note to clear the free format text.
Note: Do not use the Even if Class Not in Schedule check box.
Remaining Tabs
- Do not enter information on the Exam page. The Office of the Registrar populates this information, and it displays for
both students and faculty. You may reference this information if you receive questions.
- Do not enter information on the LMS Data page. This information was previously used
to link class sections to BlackBoard but is no longer maintained.
- Do not use the GL Interface page. The Treasurer's Office controls this information.
Note: Be certain to save your changes. To add another class, either press Return to Search or move to the next class on your previous search list by pressing the Next in List button at the bottom of the page.
Creating Schedule Of Classes (pdf)